When it comes to online purchase queries and searches, Amazon trumps Google, but the world’s leading search engine is a close second. And as an e-commerce business owner or a marketer, you should know what Google shopping is, how to set up Google Shopping, and how to sell on Google shopping.
In this Google shopping guide for beginners, we will answer all these questions and more. And whether you are an expert in e-commerce setup and marketing or you just built your first online store or website, this guide will give you the foundational knowledge about Google shopping, so you can start taking advantage of this lucrative marketing channel right away.
The Scope of E-Commerce
2020 was a difficult year for millions of individuals and hundreds of thousands of businesses across the globe, but it was a great year for e-commerce. Total retail e-commerce sales amounted to about $4.28 trillion (a 27.6% increase from 2019’s $3.354 trillion). And an even more impressive stat is that over two billion people bought products and services online.
That’s about one in four people on this planet!
The year of the pandemic became the catalyst that e-commerce didn't actually need, but it expedited the pace of the e-commerce boom anyway.
What that means for you is that an already crowded industry is about to become even more crowded, and you need to take advantage of every edge you can get. And Google shopping is one of the sharpest competitive edges an e-commerce business can have.
What is Google Shopping?
Google Shopping is Google’s own online shopping platform, where it aggregates and allows you to sort, filter, and compare different products that are available for sale online. For example, if you search for "Item A" and click on the shopping tab, you will see "Item A" ads from all the vendors that have chosen to list their products with Google shopping. This is different from Google ads and organic listings.
- When someone searches for a product/service on Google, the search engine captures the “keywords” and serves ads that are most closely associated with that keyword or contain the keyword. The ads are served alongside and in a similar way as organic queries, i.e., words only, no picture. But when something appears in Google shopping, you can see key attributes like a clear picture, price, brand, rating, and whether it’s on sale or not. Also, Google shopping listings can be both paid and free, whereas Google ads are always paid.
- When people search for something online, they often see links to that product's listing on Amazon or a local store as an organic search. The difference between that and Google Shopping is that those sellers don't have to do anything special to get their product to appear in organic results (apart from optimizing it to near perfection). But if you want a product to appear in Google shopping, you have to list it with Google.
Google shopping listings are both paid and free. The main difference between the two (apart from the dollars flowing out of your pocket) is the “real estate” the two get.
If you search for “male extra large black t-shirt” on Google, you’ll get the following results:
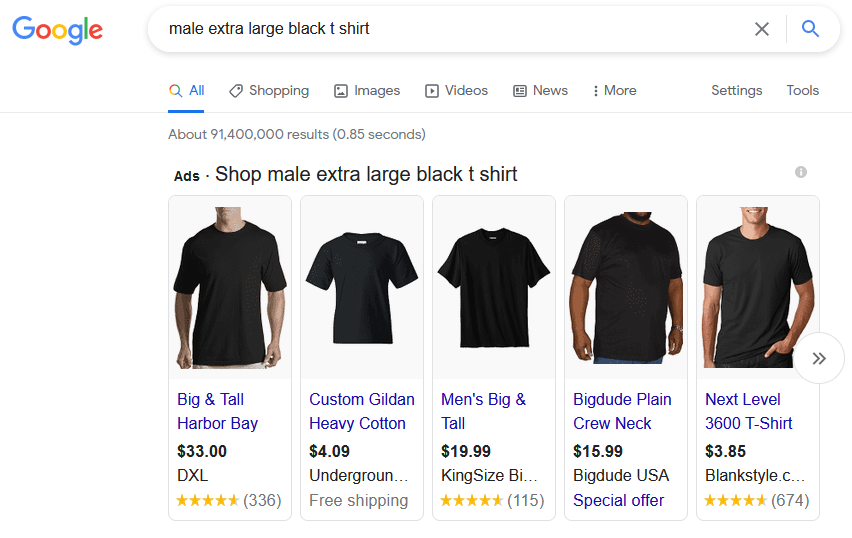
The primary real estate, i.e., right beneath the search bar, is allocated to Google Shopping "ads," i.e., paid ads. But once you click on the Shopping tab and scroll down, you’ll see both paid and free listings.
As an e-commerce trader or marketer, you know you have to make things as easy for your buyers as potentially possible. If they see your perfectly customized ad adorned with a clear photo of what they are looking for, your chance of getting a click and a sale are significantly higher than if they have to go shopping and search for your product.
But even if you can’t find the budget in your e-commerce marketing for Google Shopping, Just listing with it can be highly beneficial for your sales numbers.
Why And How To Sell On Google Shopping
Whether you are a marketer or an e-commerce seller, there is one fact you must understand: The more marketing channels you leverage, the better it is for your online visibility and, ultimately, for your sales.
But there is a consequence to that approach. The more marketing channels you explore, the more you spread yourself thin (resources-wise). And these resources include your capital, time, and energy (both yours and your team’s).
So if you are already exploring several other digital marketing avenues (SEO, PPC, social media marketing, etc.), why add another one to the list? There are some compelling benefits of using Google Shopping:
- After Amazon, most online shopping queries/searches are made on search engines (which effectively means Google).
- Most shoppers (well over 85%) conduct online research before making a purchase decision. And since they are using Google to research a product, they might find a listing on Google more accessible.
- Google Shopping ads placement is significantly better and potent compared to Google ads because the former helps you see the product, price, ratings in one go, making the purchasing decision easier.
- Google shopping ad offers better "bang for your buck," or more accurately, a significantly better ROAS or Return On Ad Spend (especially compared to Google ads). You can read a hypothetical comparison here.
- Even if the free listing doesn’t claim the most coveted real estate, it places your product on display for people who prefer shopping from Google Shopping.
Now that we've gone over why let's get to how to sell on Google Shopping.
How To Sell On Google Shopping
To sell on Google Shopping, you have to create a product listing, or if we use Google’s terminology, a product feed. This tells Google all about what your product is, its price, condition, everything. The good news is that once Google has all the relevant information, it creates the listing for you, i.e., Google shopping practically does the heavy lifting.
To create a listing, you have to open a Google Merchant Account. If you are creating your own product, you might also need to create a Google Manufacturer Account.
Note that this will help you get your product in Google Shopping, not the Google Shopping ad feed that dominates the search engine and is listed right beneath the search bar. For that, you'd have to run an ad campaign (since it's a paid placement), and for that, you'd also need a Google Ads account.
But before you open all these accounts, there are a few things you need to understand. And the first is that Google Shopping cannot be your primary listing, i.e., you can’t sell your product directly from Google Shopping. You have to have the product listed on your own e-commerce website. Even if it’s just one product, it needs to have a dedicated, fully functional e-commerce page (with online payment and checkout set up) where a consumer can go and buy your product.
That’s important because you have to claim the website you are selling your product from. And if you are only an Amazon merchant and you don’t have a website, but you still want to use Google Shopping to your advantage, there might be a way around with specific landing pages.
Simply put, if you want to learn how to sell on Google Shopping, you need three things (and an optional thing, if you want to go beyond free listings):
- A product/multiple products along with all the relevant information that Google requires
- Your own e-commerce store or website where consumers can buy your product
- A Google Merchant Account
- (Optional, for paid ads) Google Ads Account
Once you have these things, you can focus on how to set up Google shopping.
Google Shopping Guide: How To Set Up Google Shopping (Step-By-Step)
Gmail has over 1.8 billion active users, so let’s assume you are one of them. If you aren’t, creating a Gmail account is needed before you can create a Google Merchant account.
Step-1: Create Google Merchant Account
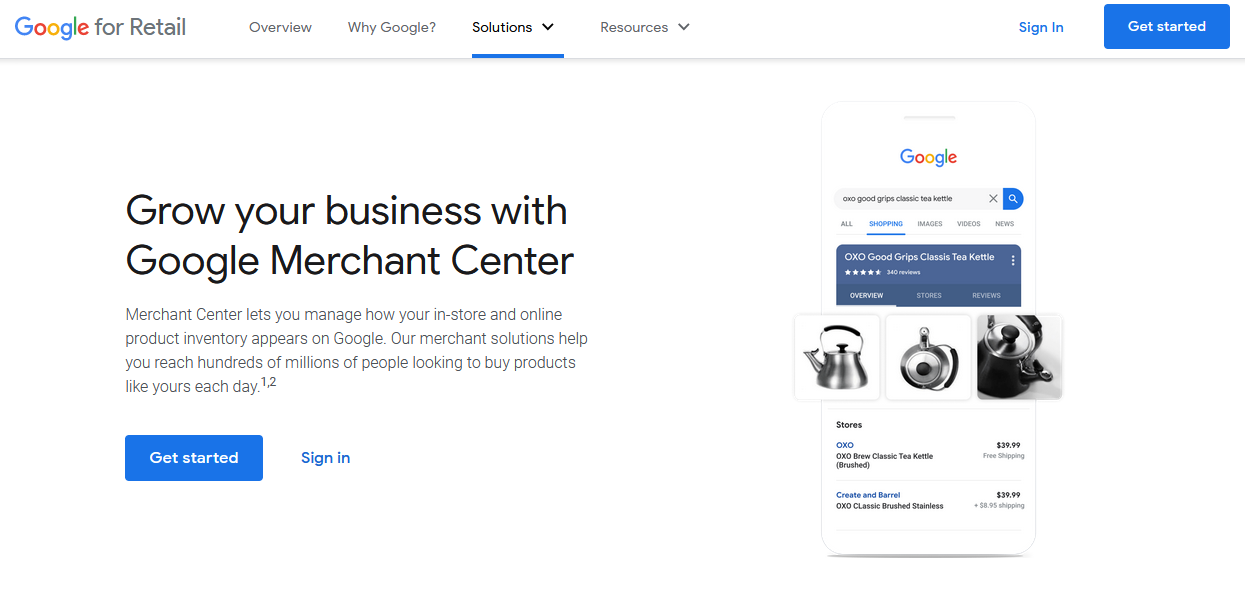
Go to Google Merchant Center. You can type it in the search engine or simply click here. Since you don’t have an account yet, you’d need to get started with “Get Started,” the blue button on the top right corner of your screen.
You'll be asked to sign in with your Gmail account. So if you don't have one, you need to create one beforehand. Once you are in, you need to provide your basic business information (just three things): Business name, country, and time zone.
Then, you have two options for where your customers can check out:
- On my website (ideal for e-commerce online store owners)
- At my local store (ideal for brick-and-mortar store owners and gets the benefit of proximity searches)
You can check yes for both.
You also have the option to integrate your Google Merchant Account with Shopify and PayPal, and Google is planning on adding more tools in the mix.
Then you just have to click I’ve read and agree to go to the next step.
Step-2: Free Product Listing vs. Shopping ads
Once you create your account, you will most likely be directed to the “Free Listing Setup.”
Now from here, you’ve two paths (with a lot of overlap):
- You can proceed with this setup if you want to create a free listing
- If you want to create a paid campaign, you press Cancel setup, and it will take you back to the Merchant Center platform (with the Manage Program tab open). There you can click on the Shopping Ads program:
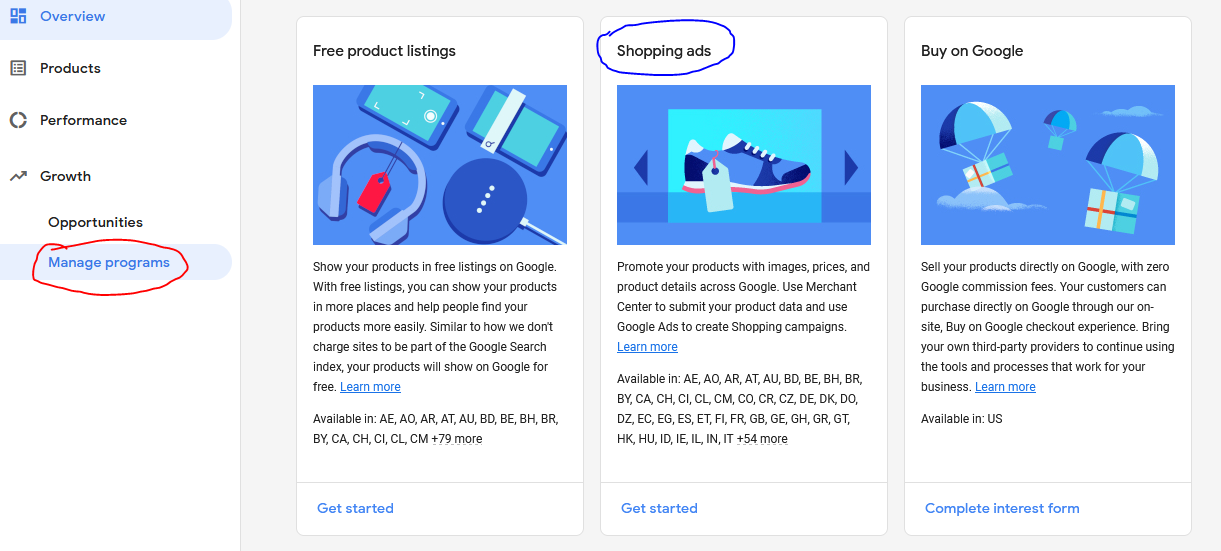
Here you will be greeted with almost the same options, with just one addition: Google Ads Account that you'll have to link. Another difference is that with Shopping ads, the tax and shipping detail feeds are not optional.
Apart from that, the two are exactly the same. Let’s assume we are proceeding with the free product listings option.
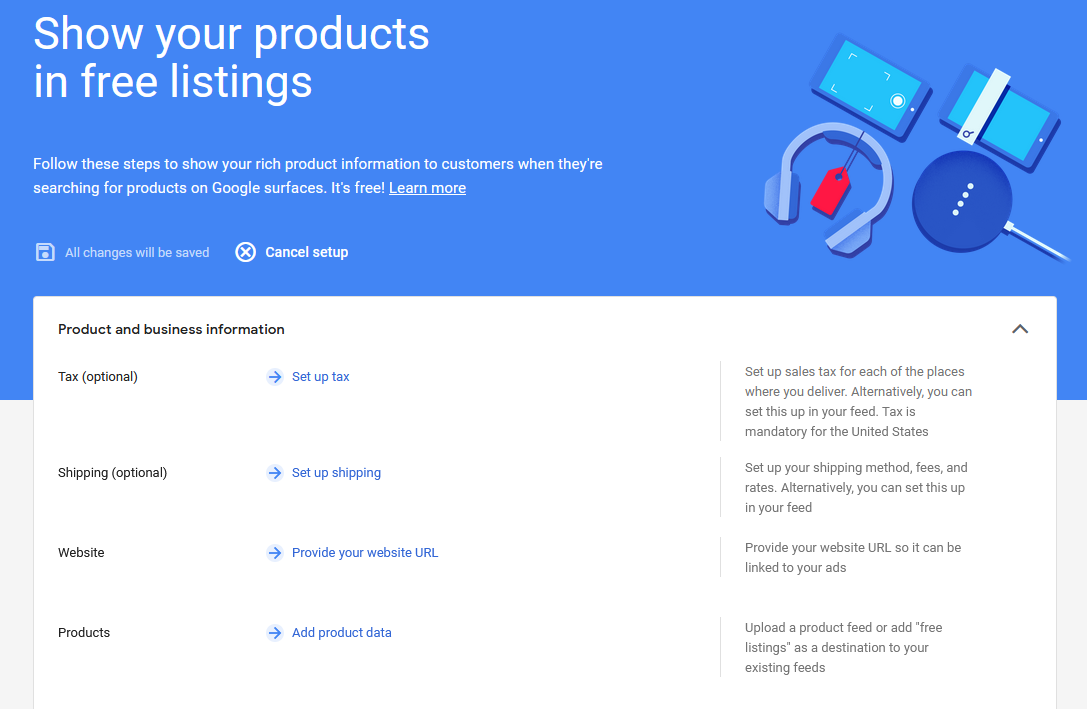
Step-3: Tax And Shipping
It's important to note that even though they are optional in free listings and compulsory in Shopping ads, it might be a good idea to enter them anyway.
Taxes Set up: When you click Set Up Tax in either program (free or shopping ads), you will be greeted by the same options. You will see the name of all states. If you sell and ship your product to all the states, you can simply click select all. If you only work with a few states, you can manually select them.
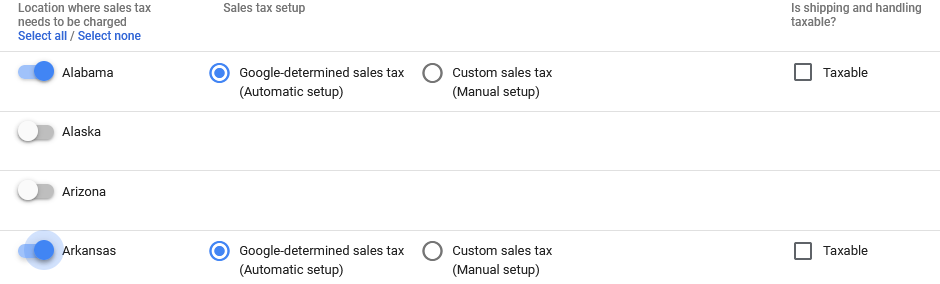
In each state, you will have the option to either let Google determine sales tax on its own, or you can set it up manually (if you have special considerations for different states and different tax rates than what Google will determine). You can also check a box to inform Google that shipping and handling are taxable.
Set up Shipping: When you click on Set up Shipping, you will find five blank columns. You have to click on the add button (located in the top left corner) to add the relevant details. You have to enter relevant data in a few fields:
- Service name (like free shipping to X, Y, and Z states)
- Countries (you can add up to 50 countries here)
- Currency (only one)
- Delivery location is preset (at the customer’s address)
- You have to choose whether you want to show custom delivery times (it’s based on your shipping location and the carrier you choose: FedEx, USPS, UPS) or set a range of delivery times (for products that are shipped to or from multiple countries). The latter is also the default setting if you don't see both of these options. Let’s click that one.
- Cut-off time (after which you won’t process orders for the day), time zone, handling time, transit time, days fulfilled, and days shipped. You can also set holiday shipping cut-offs for selected holidays.
- Shipping costs have four options (free shipping, free shipping over a certain amount, range-based, and flat-rate). Choose the one that's most convenient to you. It shouldn’t differ from your website/e-commerce store.
Step-4: Add and Verify Website
In order to add and verify your website, you have to have control over the website. So if you are not the webmaster or the owner of the online e-commerce store, you need access to its credentials and permission to make changes to the website code (don’t worry, they are not extensive).
Note that you can only have one website per one (standard) Merchant Account. If you need to add more than one website, you’ll need to set up an advanced account.

Once you enter the URL, Google will tell you (not very politely) that your website is both unverified and unclaimed. You have three simple options to verify your website:
- Google Tags
- Google Analytics
- Manually adding HTML tag to your website
The third would be the option for you if you are not using Google Tags or Analytics and don’t have the relevant account. The directions are given, and you have to have access to the website's code (and permission to modify it), and you can do that following a simple YouTube video.
Once it's verified, you have to click the “Claim Website” button to claim it.
Step-5: Add Products
This is almost the final step for people who want to learn how to set up Google shopping for free listings. And it’s a relatively long one.
Once you click Add Products Data on the free listings program, you will be directed to a dedicated tab on the Google Merchant platform: Products.
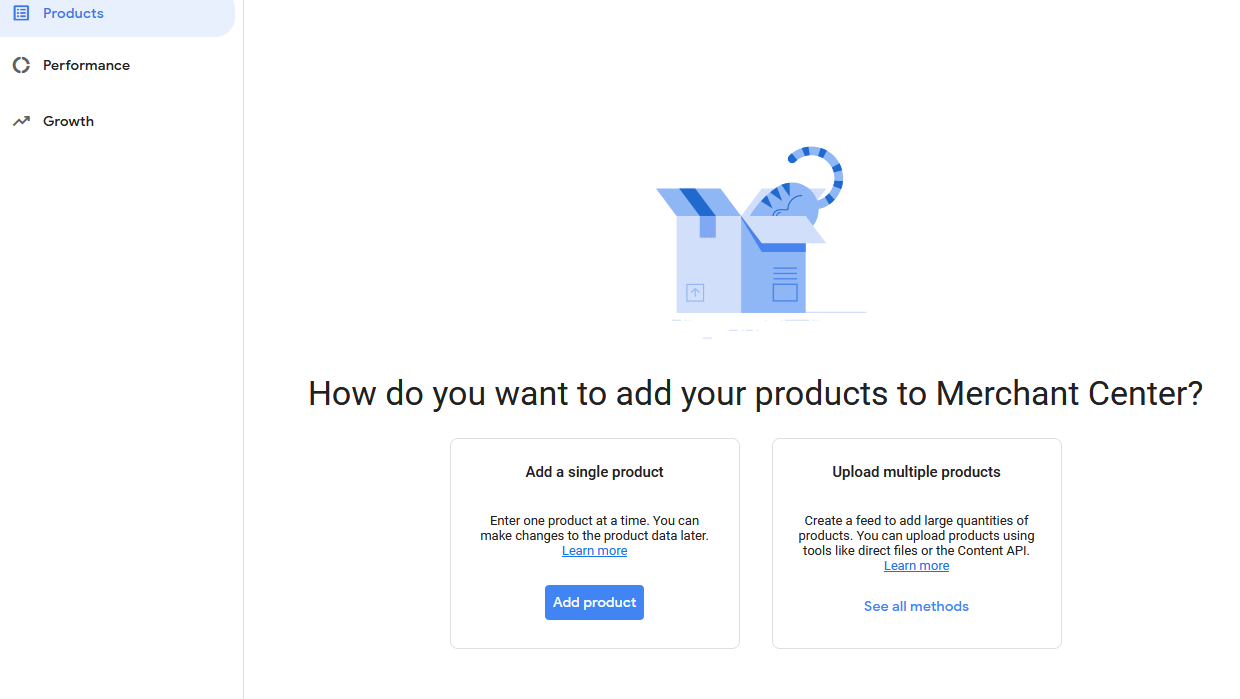
You have two options here:
- You can enter just one product or enter products one at a time, which is a relatively straightforward method. It’s an intuitive Product Data form where Google tells you exactly what it needs, and you have to enter the right data in the right fields.
- Upload multiple products is a bit different, more time-consuming, and based on the options you chose inside the multiple product options, it would require coding knowledge.
If you only have one or a few products, then adding a single product option might be better for you. It’s simple and straightforward. But we will provide instructions for the second method (multiple products). If you understand that (and what product data you need), you’ll have no trouble adding a single product.
Sub-step: Upload Multiple Products
Add country of sale and language. Remember that here you can select only one country, and that's important to note that because if you sell your products in multiple countries, you have to create separate product feeds/upload products separately for each country.
In select destinations (as in the listing’s destination, not your products), you’ll have two options: Free listings and shopping ads. You'll only see one option (shopping ads) if you've set up the Shopping ads campaign instead of the free one. You can remove the check from Shopping ads if you want to adhere to the free listings strictly and have no intention of running a paid campaign.
In the next step, you have to choose from four different ways you can upload multiple products:
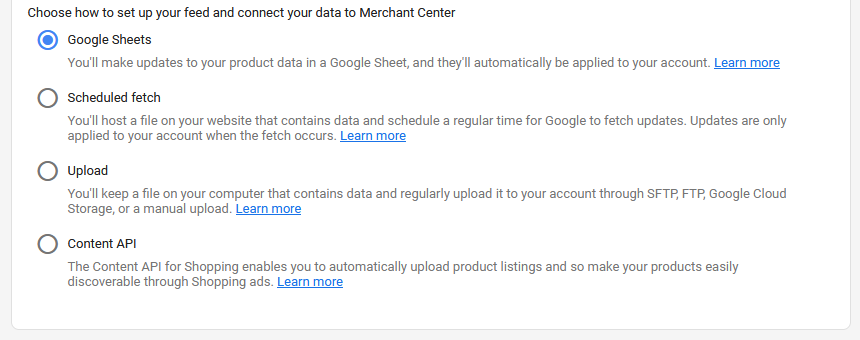
The options are easily comprehensible enough. If you choose the Scheduled fetch or Upload option, you’ll have to learn about the FTP, SFTP protocols, and a few other things before you can present your product data in the right format and using the right protocol for Google Merchant Center to fetch.
The Content API is a bit more complex, although significantly more powerful. If you know how to code and can maintain and modify an API, this might be a good option for you.
For everyone else, the most straightforward approach is to go with the Google Sheets option. You have to give your primary feed a name (no matter which option you choose) as well. Press Continue. You might need to add an exception if you are using a browser other than Chrome for the pop-up window. It will simply ask which Gmail account you want to link with Google Merchant Account for the Google Sheet.
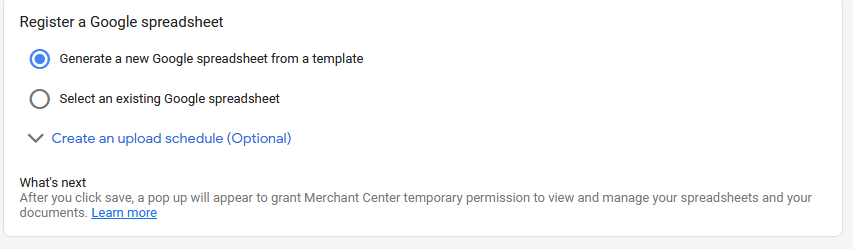
Once you click the Create Feed button, you’ll be taken to a Google Spreadsheet with all the necessary product fields already laid out. There are also useful links that explain (in detail) the product data fields that you have to enter.
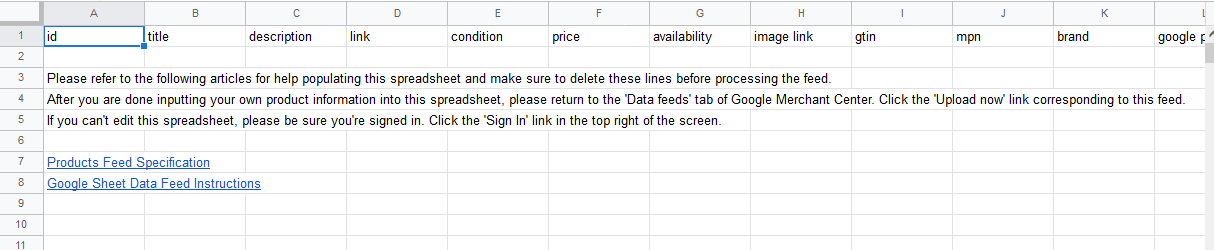
Id: It's a unique identifier (yours, not manufacturer's or universal), and if your product doesn’t have one, you can create one on the spot.
Title: Name of the product. Keep good title practices in mind (using keywords, name formulae, keeping important information in the first 70 characters, etc.).
Description: Description of the product.
Link: Link to the product’s page on your website.
Condition: New, refurbished, used.
Price: Put in the amount and currency (in words, not symbols).
Availability: Make sure it’s updated accordingly.
Image Link: One image, follow Google’s directions.
GTIN: Global Trade Item Number. It’s not necessary for product approval, but it’s still a good idea to provide that.
MPN: Manufacturer Part Number. Usually not needed.
Brand: Specify the brand name.
Google Product Category: It’s imperative that you get it right. Google has clearly classified/identified product categories. You can download the excel file or check it here online. Make sure you follow the exact format.
You have to do that for each product. The good idea is to export product data from your original product listing and put it in the right fields. It can become impractical for hundreds or thousands of products, and you might have to go with other options.
Once you’ve added the data, you can go out and check your product feed. If it’s not processing, you can click fetch now to force the process. But it will take some time before Google approves your product and it’s ready for listing. If it doesn’t approve your product, it might be because you missed a necessary field or entered the wrong data. It will guide you on how to fix your mistakes.
Once your product(s) is approved, you are good to go.
Final Words
That's the process for free Google shopping listings. For paid ads, you have to do more than just add your Google Ads account to your Merchants account, i.e., you have to run a full-fledged paid marking campaign, the instructions for which are beyond the scope of this article. But we hope that this small Google Shopping Guide answered the following questions:
- What is Google Shopping?
- How to set up Google Shopping?
- How to sell on Google Shopping?
The steps in this guide should help you get started on the exciting (and profitable) path of Google Shopping.